
I love Udi’s gluten free baked goods – from their bread and pizza crust to the muffins and granola. When I discovered that Udi’s opened up a pizza cafe bar, it quickly became my favorite lunch spot…so much so that I’ve probably tried 60% of the items on the menu. Their salads and salads are always fresh, their gluten free sandwiches and burgers are awesome (particularly toasted) but their pizzas are my favorite. The first time I tasted their roasted squash pizza with goat cheese, roasted garlic, arugula and balsamic vinegar, I was hooked. When Fall hit this year, I knew exactly what pizza I ‘d be making – a twist on my Udi’s fav.

The original calls for a white béchamel sauce but I brushed the crust with olive oil instead and I made balsamic caramelized onions in lieu of a separate balsamic reduction to save time. Roasting the squash, caramelizing the onions and making my own crust already required a bit of time…and let’s be honest, I just wanted to eat my pizza 🙂 I must say, the recipe totally hit the spot and I didn’t have to spend $15!
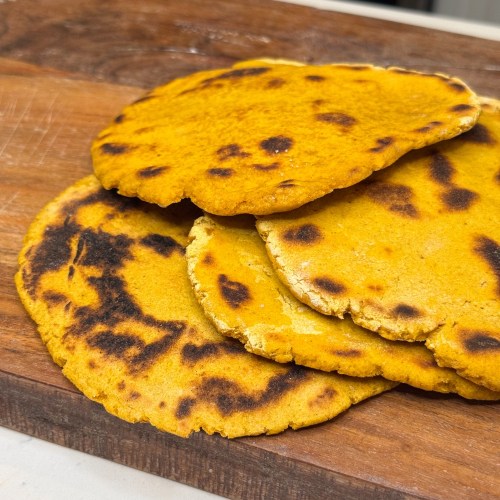
While I was trying new recipes, I also made Ricki’s bean-based grain-free pizza crust instead of a pre-made crust or my easy cooked rice crust. I only made a few small changes – subbing tapioca starch for the potato starch, added a bit of garlic powder to the crust and made four 6-inch individual pizza crusts instead of one large. This crust holds up beautifully and you could actually hold it like a normal pizza! This tends to be a challenge for gluten-free crust without any xanthan or guar gums so I was quite pleased with the results: it’s crisp on the outside, can “handle” heavy toppings and is high in fiber from the beans and coconut flour…plus it’s grain-free and egg-free for those who are sensitive. Ding, ding – winner!

Caramelized Onion, Roasted Butternut and Goat Cheese Pizza
Ingredients
1 large gluten free pizza crust or 1 recipe pre-made Bean-Based, Grain Free Pizza Crust (recipe below)
2 1/2 cups peeled butternut squash, cut into 1/2 cubes (kabocha could be subbed)
3 Tbsp olive oil, divided
1 onion, halved and thinly sliced (I used a medium red but white or yellow will work)
1 Tbsp balsamic vinegar
sea salt and black pepper
2 1/2 to 3 cups arugula, roughly chopped
5 – 6 ounces crumbled goat cheese (if you don’t like goat cheese, feta or your favorite cheese could be used)
1 Tbsp fresh sage, roughly chopped
Directions
1. Preheat oven to 400F. In a large baking pan, toss the squash with 1 Tbsp of the olive oil and season with black pepper and sea salt. Bake the squash until slightly browned and tender, about 30 minutes, tossing once halfway through to ensure even cooking. Remove from oven and set aside.
2. While the squash is baking, in a large skillet, add sliced onions and 1 tbsp of olive oil over a medium heat. Saute until onions begin to color, stirring frequently. Add the balsamic vinegar and a dash of salt and stir or toss to combine. Cover, reduce the heat to low-medium, and let cook for about 25 minutes, or until the onions have cooked down and caramelized. Set aside.
3. Once all of your toppings are ready and crust is pre-baked and warm (per instructions for pre-made or see below for the recipe I used), remove crust from the oven. Brush remaining olive oil over the crust and top with cooked squash, onion, chopped arugula, crumbled goat cheese and sage.
4. Bake until the crust is crispy, lightly browned and toppings are heated through and cheese starts to brown slightly on top, about 15-18 minutes.
*Feel free to use your favorite crust or a pre-made and store bought if your prefer, just note the oven temperatures for the crust and the baking times.

Bean-Based, Grain Free Pizza Crust (Vegan, Gluten Free, Sugar Free) (lightly adapted from Ricki at Diet, Dessert and Dogs)
Ingredients
1 can (19 oz or 540 ml) white kidney or navy beans, rinsed well and drained (about 2 cups/480 ml)
1/4 cup (60 ml) extra virgin olive oil, preferably organic, plus about 1/2 Tbsp (15 ml) extra
1/2 cup (120 ml) unsweetened plain soymilk or almond milk
5 drops plain stevia liquid
4 tsp (1 Tbsp plus 1 tsp or 20 ml) apple cider vinegar
1/4 cup plus 2 Tbsp (45 g or 1.6 oz) coconut flour
2 Tbsp (30 ml) whole chia seeds, ground to a meal in a coffee grinder (about 1/4 cup or 60 ml of the meal)
2 Tbsp (30 ml) Tapioca starch (or potato starch)
1/4 cup (60 ml) buckwheat flour
1/2 tsp (2.5 ml) baking soda
3/4 tsp (7.5 ml) baking powder
1/8 tsp (.5 ml) fine sea salt
1/2 to 1 tsp garlic powder, optional
1 tsp (5 ml) dried basil
Directions
1. Preheat oven to 375F (190C). Line a large pizza pan OR four 6-inch baking pans with parchment, or spray with nonstick spray.
2. In the bowl of a food processor, process the beans until you have a chunky paste. Add the remaining ingredients (except for extra 1/2 Tbsp oil), soymilk, stevia, vinegar, coconut flour, chia meal, potato starch, buckwheat flour, baking soda, baking powder, salt, garlic and basil and process again until the mixture comes together in a ball. Do not overprocess!
3. Take the ball of dough and, using your hands, pull of chunks the size of baseballs and distribute them evenly over the pizza pan OR divide into four balls of dough, then divide again into smaller balls for four individual crusts. Use the final 1/2 Tbsp of oil to grease your palms and fingertips; then press the dough evenly in the pan until all the chunks come together in a single crust. Keep greasing your hands as necessary to avoid sticking. If desired, make a slight rim all around the edge of the dough.
4. Bake in preheated oven 30-35 minutes, until the crust is lightly browned on the edges and bottom. Top with desired toppings, then return to the oven for another 15-20 minutes for individual pizzas or 25-30 minutes for one large crust, or until until heated throughout and toppings are cooked. Slice and enjoy!
Makes 1 large pizza of 4-6 servings OR 4 6-inch individual crusts. May be frozen; wrap slices individually in plastic and freeze until solid, then store in a Ziploc bag